 |
|
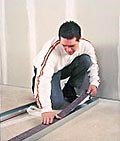
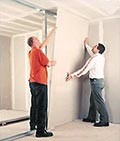
1. Measuring and scoring
The position at which the walls are to be built should be marked on the floor using a chalk line. If the studs are not fixed immediately after the positions of the partitions have been located, a permanent marker should be used.
Next, using a spirit level or a plumb line, transfer the position of the partition from the floor to the ceiling. For larger projects, a construction laser is recommended.
The position of door frames and load bearing members should also be located and marked on the floor. |
|
|
|
 |
|
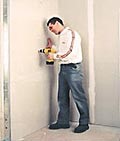
2. Fixing the studwork
Fermacell can be fixed to either timber or steel studwork – the choice is yours. Timber is often a more familiar and readily available material, and may be more appropriate in certain circumstances – for example in timber frame housing – whilst steel studwork is lighter, generally faster to install and has better acoustic characteristics. The layout of the partition remains the same for both systems, although the actual installation is different. |
|
|
|
 |
|
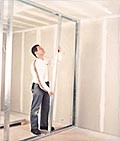
3. Steel studwork
The U channels at the base and head should be fixed to the floor and ceiling, in the positions already marked. The two end vertical C studs can now be fixed in position. There should be a 10mm thick mineral wool insulation strip between these components and the adjoining building element.
The maximum distance between fixings should be 700mm horizontally and 1000mm vertically. The distance between fixings must be reduced when connecting to uneven surfaces and when increased sound insulation is required.
In order to fulfil the fire protection and sound insulation requirements, connections should be installed using the appropriate materials. To achieve this, intumescent or acoustic flexible sealants can be used. Mineral wool insulation strips should also be incorporated in the connection. In general, fire resistant sealants should be used for partitions where an element of fire protection is required.
If the partition being constructed is a double stud system, two separate parallel subframes are installed in the same way as a single stud system but with a small air gap – typically 10mm – separating the two frames.
The C studs are inserted perpendicularly into the U channels. Please note: the vertical studs should not be fixed mechanically, but should be cut short of the ceiling height by 15mm and floated within the channel. It is also important that all C studs ‘face’ the same way. The direction in which they face is decided by the sequence in which the boards will be installed. Where two boards are fixed to a stud, as at a joint, the first board to be fixed should be fixed to the ‘open’ side of the C stud.
Therefore, if you plan to fix boards from left to right as you look at the partition, the C studs should all have their open side facing to the left.
The vertical C studs are positioned roughly at the required centres with the open face towards you and turned through 90° to lock it into place. The distances between the vertical C stud centres depend on the thickness of the board being used. The first board can now be fixed in position.
Horizontal studs – noggins (or dwangs in Scotland) are not normally required, even behind jointed boards. This is because the jointing system provides a joint as strong as the board itself, and the boards can carry very heavy loads without additional support.
If a double metal stud system is being constructed, an air gap between the C studs should be maintained to achieve the best sound insulation results. If the partition height is greater than 3000mm, stability of the partition should be maintained by incorporating cross bracing or similar between the parallel C studs. |
|
|
|
 |
|
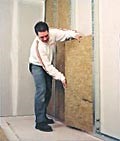
4. Timber studwork
The sole and head plate should be fixed to the floor and ceiling, in the positions already marked. The two end vertical studs can now be fixed in position. As with steel studs, there should be a 10mm thick mineral wool insulation strip between these components and the adjoining building element.
The maximum distance between fixings should be 700mm horizontally and 1000mm vertically. The distance between fixings must be reduced when connecting to uneven surfaces and when increased sound insulation is required.
In order to fulfil the fire protection and sound insulation requirements, connections should be installed using the appropriate materials. To achieve this, intumescent or acoustic flexible sealants can be used. Mineral wool insulation strips should also be incorporated in the connection. In general, fire resistant sealants should be used for partitions where an element of fire protection is required.
If the partition being constructed is a double stud system, two separate parallel subframes are installed in the same way as a single stud system but with a small air gap – typically 10mm – separating the two frames.
The vertical studs are fitted perpendicularly to the head and sole plates with nails or metal angles at the appropriate centres.
As with steel subframes, horizontal studs – noggins (or dwangs in Scotland) are not normally required. |
|
|
|
 |
|
5. Electrical and other services
Electrical and other services can be installed both horizontally and vertically in the void in the partitions before fitting mineral wool insulation and the Fermacell boards. Vertical studs should be drilled in the appropriate positions to allow building services to be passed through the studs. Any services should be adequately protected and installed by a suitably qualified person. Where specific or higher levels of sound insulation or fire performance are required, take care to ensure that any openings do not adversely affect the performance of the partition as a whole. This can generally be achieved by adding a pad of the same thickness Fermacell to the board behind the opening and ensuring that the mineral fibre is continuous behind the opening. The pad should extend beyond the limit of the opening by a minimum of 100mm in each direction. Avoid more than one opening per vertical stud. |
|
|
|
 |
|
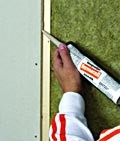
6. Installing insulation batts
If needed, mineral fibre insulation, preferably in the form of rigid batts, can be installed in the spaces between the studs in the Fermacell partitions. The thickness and density of the mineral fibre installation will depend on the sound insulation and fire protection requirements of the partition. Please see the relevant test data for more details. Typical constructions showing the fire performance and sound insulation values are shown in our Handy Guide. The mineral fibre insulation should be a sufficiently tight fit to prevent the material slipping. Gaps or holes within the insulating material reduce the sound insulation and fire protection, as well as the thermal performance. Double layers of insulation should be fitted staggered. |
|
|
|
 |
|
7. Before fixing Fermacell
The boards can now be fixed to the subframe using the techniques described in steps 8 to 11. It is important to note that Fermacell boards are fixed symmetrically on the vertical studs, ie the boards are mounted on the same studs either side of the partition. This prevents distortion in the partition. The order in which each board is fixed with Fermacell screws to the vertical C studs can be seen on in our Handy Guide. When fixing Fermacell to steel subframes, the boards must only be fixed to the vertical C studs. And when installing on timber studwork, boards must be fixed to both vertical studs and horizontal head and floor tracks. Normally, Fermacell boards should be mounted vertically on the subframe. Ideally the length of the boards should correspond to the height of the room, minus 10mm for the joints at the top and bottom of the boards. Where curved partitions are being installed, only large format boards (typically 2400mm x 1200mm or greater) should be used and the boards should be installed sideways. Stud centres should be reduced to 250mm or less. It is recommended that 10mm boards are used in this instance. Using traditional dot and dab is not recommended for fitting Fermacell. This is because a weak adhesive joint between the dab and the masonry can reduce the exceptional weight carrying capacity of Fermacell. It is also difficult to align boards that are edge glued with Fermacell Jointstik. For this reason, mechanical fixings using timber battens (typically 2” x 1” – 50mm x 25mm) or metal firrings screwed to the wall provide a better result. The latter can also be dabbed using a mechanical backup. All of these will provide a suitable subframe for the adhesive jointing system. If you insist on dot and dab, then ensure that the whole of the perimeter of each board is adequately covered with bonding compound, and leave a 5-7mm gap and joint as you would when using offcuts. When the joint filler is dry, apply a PVA coat approximately 100mm wide over the joints, tape over the joint using Fermacell fibre tape and allow to dry. Apply a second layer of PVA over the tape and allow to dry. For dot and dab, you need to allow for mechanical anchors (frame anchors or similar) to each board as a safety factor. |
|
|
|
 |
|
8. Fixing board to stud
Boards are cut with woodworking tools and fixed with Fermacell screws or suitable staples. Non-factory cut edges are left 5-7mm apart and jointed with Fermacell Joint Filler later. |
|
|
|
 |
|
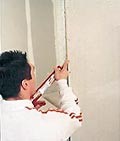
9. Applying Jointik to board edge
Simply glue the board edges with Fermacell Jointstik before you butt and fix the boards. Glued joints require no taping and are set within about 24 hours. |
|
|
|
 |
|
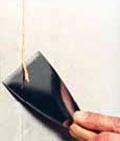
10. Scraping off excess jointstik
Scrape off excess Jointstik. Fill any gaps or screw heads with Fermacell Joint Filler. The boards are then ready to paint, tile or paper. |
|
|
|
 |
|
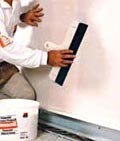
11: Applying fine surface treatment by squeegee
For a “glass” finish, simply spread with ready mixed Fine Surface Treatment, squeegee the surface to remove excess, and wait 45 minutes. A perfect finish with no plastering. |
|
|
